DigitalRamen ThemePark Tutorial
Thursday, 11 October 2007
Page 8 of 12
Part 3 - putting your graphics into ThemeParkIf you don't have Photoshop, Part 4 of this chapter will give you specific directions that you can use without Send and Receive, but you should still read this. If you do have a supported version of Photoshop, you can completely ignore Part 4 unless you just feel like educating yourself. Supported versions are listed in Chapter 1, Part 1. Here's a quick summary of this section. It gets pretty dense while trying to explain how things work, but you really don't need to know much to actually import and export images. To import an image with transparency from Photoshop, select the resource you want to replace and then press the Receive button in ThemePark. This will import whatever window is topmost within Photoshop (so if you have multiple images open, make sure the one you want is the active window before switching to ThemePark). To import a solid image with no transparency at all, you can simply drag the image into ThemePark from Photoshop, the Finder, or wherever you might happen to have it. The Receive button will also work. To export an image from ThemePark to Photoshop, select the element you want and then press Send in ThemePark. This will open it in Photoshop, complete with any transparency it might have. If the element in ThemePark is completely solid with no transparency, you can copy and paste it into Photoshop. Now that we've covered saved resources, let's get back to what we were doing. You had just edited the Description, and had selected the Preview resource. This presents you with a pane stating "No Preview", and near the bottom of the window there are some dimensions and a slider. The "No Preview" text is in fact an image, and the slider changes how much that image is zoomed. It's pretty self explanatory, but run the slider back and forth right now just to get the hang of it. The slider is generally fairly useless, as you'll probably be doing most of your zooming in and out on a graphic in Photoshop, but it can be helpful if you're trying to see if any glitches in the graphic were introduced when you put it into ThemePark. The dimensions are also fairly self explanatory, and I won't insult you by describing what "width" is. Let's put your first graphic into the ThemePark Preview resource. It doesn't matter if you'll actually use it later, in fact most preview images are small screenshots of the theme in use (and obviously you don't have one of those yet). Preview images are generally about 250x150 pixels. They can be both wider and taller than that, but 250x150 is a nice round number that won't make the preview image space in ShapeShifter feel cramped. Let's create a quick preview image together. In Photoshop, create a new RGB graphic with a transparent background, 250x150 pixels. Draw something in the image, it can be just a squiggle if you want. The important thing for this tutorial is that the edges of the image are all completely transparent. If some parts of the image have varying levels of opacity, even better. When you're done, use the Move tool to drag your image to where the "No Preview" graphic is in the Preview resource. ThemePark will then tell you that the new image is the wrong size, and you can Resize, Cancel, or Scale the new image. Scaling it will just shrink your new image to the size of the No Preview graphic, and that's not what we want. Hit "Resize Element". 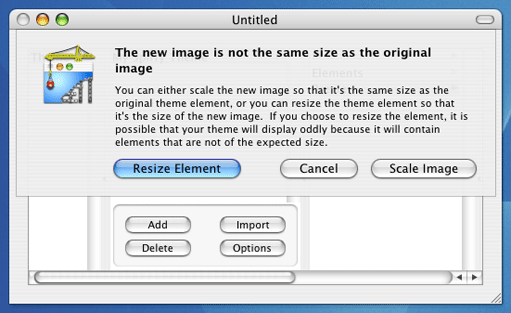
Unfortunately, this will not give you what you expect. The transparency will look odd, and if you check the dimensions they won't be the same as the image you created in Photoshop. What happened? ThemePark works great with solid images that have no transparency. You can drag those in from anywhere - GraphicConverter, the Finder, Photoshop, anywhere. But when transparency comes into play, it needs some help. When you dragged your image from Photoshop, all that ThemePark received were the edited parts, and essentially cropped the graphic to omit the transparent edges. That's no good at all. In ThemePark, select the graphic you just dragged in and then press the Send button in the toolbar. This will open it in Photoshop, where you can see that what you had wanted to be transparent was replaced with white, and it probably went through some other weirdness as well. But don't worry, the solution is easy. 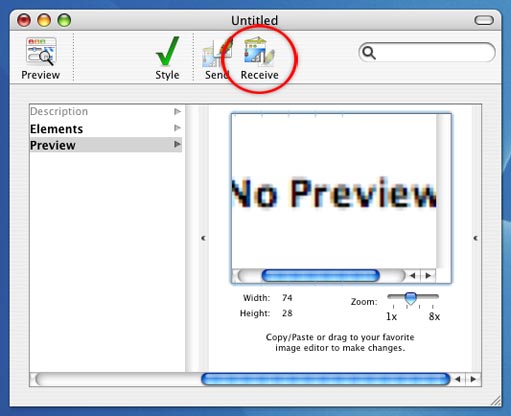
Select the image you want as your preview, then go into ThemePark and select the preview image element, and press the Receive button in the toolbar. It will again tell you that the new image is a different size and ask what to do, so press Resize Element. And there you have it, your partially transparent image should be in ThemePark now, exactly as you'd expect, even with the correct dimensions. It might appear to have a white background, but to test the transparency you can always just select the element and press the Send button in the toolbar. This will open it in Photoshop, and it will be an exact copy of the original image you made. Send and Receive are your two best friends. Working with transparency masks prior to their introduction in ThemePark was a time consuming chore, but those masks are created instantly by ThemePark now (and have even been removed from the interface entirely). Unless the image you want to import has absolutely no transparency and completely fills its dimensions, you should always use Receive to import an image from Photoshop. |
Search |