DigitalRamen ThemePark Tutorial
Thursday, 11 October 2007
Page 10 of 12
Chapter 4 - The Good StuffPart 1 - manipulating multiple elementsFirst, let's talk about Apple's themes. In the Appearance System Preference, you can change your system from Blue to Graphite. Instead of bubbly aqua with traffic light window close/minimize/zoom widgets, everything is changed to a more subtle Graphite hue. "This is great," you might think. "Now I can have two styles within one theme by taking advantage of Blue and Graphite!" In a perfect world, it would mean that. But the fact is that very few people ever go into the Appearance preference pane with any regularity, and even among those very few switch from one appearance to another. People simply don't think to look. It's not their fault, they're not failing to use their computer in some way, it's just the way things are. 
This means Blue and Graphite should actually look the same to prevent an entire style of your theme going unused for no other reason than people didn't think to look in an obscure system preference. Sure, a small number of people will find it and think it's a pleasant surprise, but the majority just won't know it exists. All variations of your theme should use their own variant, which can be added in the 2nd pane from the left in ThemePark. So now we have a problem. We can't just ignore Graphite, because someone might be using that appearance without even thinking about it. There are hundreds of independent Blue and Graphite elements. How can we quickly copy your changes to Blue over to Graphite? The key is copying and pasting entire resources in one action. Let's go to Theme > Variant > Elements > Global Elements > Push Buttons > Large Push Buttons. There are 8 resources to be edited here, broken up between Blue, Clear, Graphite, and Inactive. Let's ignore the inactive ones for now, and treat Clear like Graphite. We'll get to the meaning behind Clear in Part 2 of this chapter. In the Caps - Blue resource, there are a total of 10 elements - 5 graphics and 5 click masks. The click mask defines where you can click and something will happen as a result of that click, with the black defining clickable regions while white defines where clicks are ignored. The clickable region is generally slightly larger than the graphic so users don't have to be absolutely perfect with clicks on the button itself. The close, minimize, and zoom widgets in window titlebars are a good example of where it's smart to have a large click mask even if the widget graphic is small - who wants to futz around clicking on an exact pixel just to minimize a window? 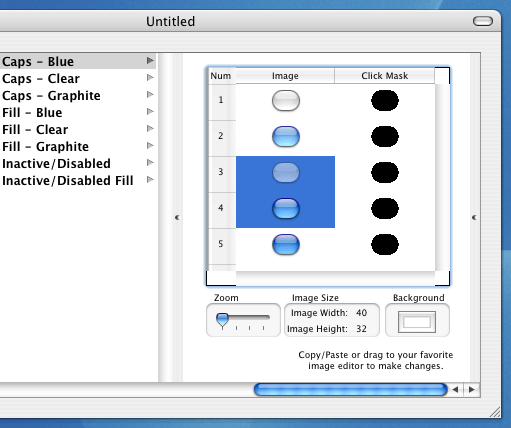
Within Caps - Blue, select the 3rd and 4th elements in the Image column using the shift key, and then Edit menu > Copy them. Now select the 1st and 2nd elements in the Image column and Edit menu > Paste. The two elements you copied should now replace the two you pasted over. You can copy and paste as many elements as you'd like, in rows or columns or both. The only thing to keep in mind is that the actual number of elements selected is important when pasting. For example, if you copied 3 elements in one column, you would only be able to paste those over 3 elements in another column, not 1 or 5 or 12. If you copied 4 elements in a square, you would only be able to paste them over 4 elements in a square. The only exception to this is if you only copy 1 element, because that 1 element will be automatically multiply to paste over however many elements you select. Just remember that all elements within a resource must be the same size, and if you try to resize one it will ask if you want to resize them all or scale the one to fit. Quick tip: To select an entire row or column, simply click on its header. For example, in the screenshot above you would click where it says "Click Mask" to select the entire column of black and white click masks. Using the shift key you can add more columns or rows to your selection. Play around with the Caps - Blue resource and get some of the elements out of order. Assuming you haven't unselected it, you can Undo to your heart's content - but let's keep it all messed up for now. Edit menu > Select All of the elements in Caps - Blue, copy them, and then select all of the elements in Caps - Clear and paste. All of the elements in Caps - Clear should now look exactly like the ones in Caps - Blue, and you can of course have the same result in Caps - Graphite. By copying and pasting multiple elements, you can quickly and easily sync Graphite, Clear, and Blue resources. One more tip. Not only can you copy and paste multiple elements in ThemePark, you can also select multiple elements, Send them to Photoshop, edit them as all part of one big image, and then Receive them back in ThemePark. If there's any one way to speed up the theme creation process, it's by doing a as much of the work at one time as possible. |
Search |